Water’s coming in and every roofer in town is booked out. The move most people get wrong: they climb up to patch the outside first. Do the opposite. The fastest way to temporarily stop a roof leak is from inside your house, where it’s dry and you won’t fall. Find the entry point in the attic, catch the water at the source, and relieve any bulging ceiling before it lets go. Only if the roof is dry, low, and reachable should you tarp or seal from above. And if you’re in Quincy or anywhere on the South Shore in January, there’s a good chance the real problem is an ice dam, not a hole, which changes everything about what you should do. Here’s the full sequence.
A temporary roof leak repair is any short-term step that stops or slows water from getting into your home until a permanent fix happens. It buys days or weeks, not months. The main methods are interior water control, a roofing-cement patch on small breaches, a self-adhering membrane patch on larger ones, and a tarp over the damaged section.
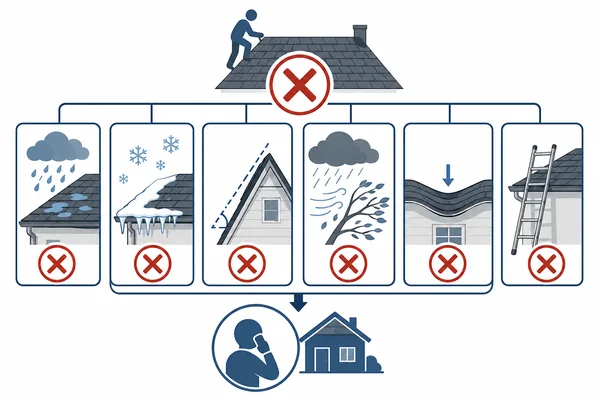
First, Know When To Stay Off The Roof
Most leaks don’t require you to get on the roof at all, and after a New England storm you usually shouldn’t. Wet asphalt is slick. Storm-loosened decking hides soft spots that give out under your weight. Snow and ice make a winter roof a non-starter for anyone without fall gear.
OSHA classifies anything steeper than a 4 in 12 slope as a steep roof, meaning it rises more than 4 inches for every 12 inches across, and it wants fall protection above 6 feet off the ground. Most homeowners have neither the harness nor the practice. That’s not a small thing. Studies built on U.S. Consumer Product Safety Commission injury data count more than 130,000 ladder-related emergency-room visits a year in this country. A dry ceiling isn’t worth being one of them.
| Situation | On the roof? | Do this instead |
|---|---|---|
| Active storm, wind, or rain | No | Stay inside, control the water, wait it out |
| Wet roof, ice, or snow on it | No | Work from inside; never climb a snowy roof |
| Steep pitch (over 4 in 12) | Not for homeowners | Inside work, then call for safe access |
| Sagging, holes, or soft decking | No | Call for emergency stabilization, shoot photos from the ground |
| Dry, calm day, low reachable section | Maybe, with a spotter | Smallest possible repair, someone holding the ladder |
I’ll say what a lot of roofers won’t: if the only way to reach the leak is a bad climb, don’t do it. We would rather come out and cover it than meet you in an emergency room. When the damage is bigger than a DIY fix or the roof isn’t safe to walk, that’s what our emergency roof repair crew is for, usually same day.
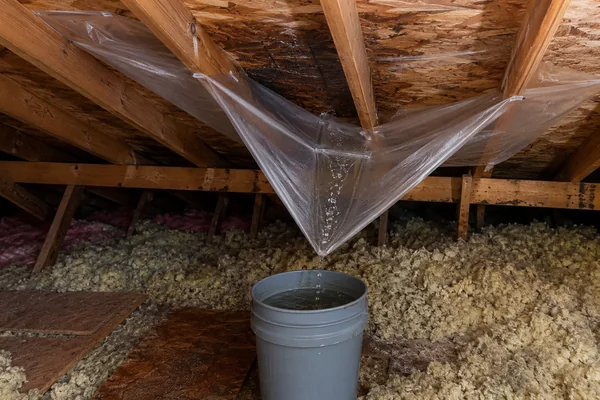
What Can You Do Right Now, From Inside?
Plenty, and this is where the real damage gets stopped. The goal inside is simple: get the water into a bucket and away from your insulation and drywall.
Head to the attic with a flashlight. Find where the water is actually coming in, not where the stain shows on the ceiling below. This is the part people get wrong. Water rides down the rafter or the decking before it drips, so the entry point often sits several feet uphill, toward the ridge. Follow the wet trail up and you’ll find it.
Put a bucket right under that entry point. Drape plastic sheeting or a contractor bag over the surrounding rafters and insulation, and staple or tape the edges so water runs down the plastic into the bucket instead of soaking everything. Wet insulation stops insulating and starts growing mold. The EPA says mold can take hold within 24 to 48 hours of a material getting wet, so drying out isn’t optional. It’s the line between a paintable stain and a torn-out ceiling.
| Step | What to do | What you need |
|---|---|---|
| 1. Find the entry point | Attic with a flashlight; follow the wet trail up the rafter to where it starts | Flashlight |
| 2. Catch it at the source | Bucket under the real entry point, not the ceiling stain | 1 to 3 buckets |
| 3. Protect the insulation | Plastic sheeting over the rafters to steer water into the bucket | Sheeting, staples or tape |
| 4. Relieve a bulging ceiling | Poke a small hole at the low point of the bulge, bucket underneath | Screwdriver, bucket |
| 5. Dry the space | Fans and a dehumidifier in every wet room and the attic | Box fans, dehumidifier |
| 6. Document it | Photos and video, before and after your work | Phone with timestamps |
If a ceiling downstairs is sagging and heavy with water, poke a small hole at the lowest point of the bulge and put a bucket under it. It feels wrong. It’s right. A controlled trickle beats the whole ceiling coming down on your floor at 2 a.m.
How Do You Find Where The Roof Is Actually Leaking?
Start in the attic, not on the roof. Water enters at one point and travels, so you trace it backward. On a dry day, look for stained or damp decking, daylight through a gap, a rusted nail, or matted insulation. During an active leak, follow the drip up the wood to its highest wet point. Push a nail or a piece of wire up through that spot so you can find it from outside later.
After years on Massachusetts roofs, I can tell you the leak is hardly ever where the homeowner expects. It’s usually flashing around a chimney, a cracked pipe boot, a tired valley, or the edge of the roof, not the open middle of a shingle. From the ground, all of that looks fine.
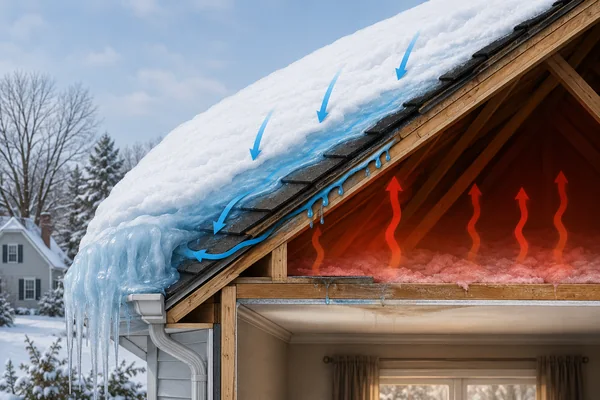
Why Massachusetts Roofs Leak In Winter (It’s Usually An Ice Dam)
If your ceiling only leaks in winter, you probably don’t have a hole. You have an ice dam. Snow sits on a roof that’s warm from the house below, melts, runs down to the cold overhang, and freezes into a ridge of ice. Water pools behind that ridge and works its way back up under shingles that aren’t even damaged.
The University of Minnesota Extension, whose guidance is the reference most roofers use on this, points to heat escaping into the attic as the cause. Boston averages 49.2 inches of snow a year in NOAA’s 1991 to 2020 normals, so around here this isn’t a freak event. It’s most Januarys.
Here’s why it matters for a temporary fix: cement or a tarp over the spot does nothing for an ice dam, because the water is entering under intact shingles. The move is to pull snow off the lower few feet of roof with a roof rake from the ground, and, if you can do it safely, lay a sock or leg of pantyhose filled with calcium chloride across the dam to melt a channel. Skip rock salt (it stains siding and eats metal) and never chip at the ice with a hatchet. Older Massachusetts roofs are the worst for this, and if yours keeps doing it, the fix lives in the attic, not on the shingles. Air sealing, insulation, and ventilation, plus a real ice-and-water barrier at the eaves, is the GAF system we install to stop it for good. It’s also worth understanding the dangers of an old roof if yours predates that barrier being standard.
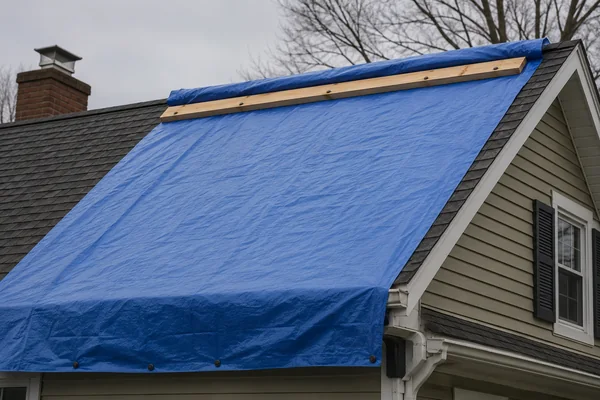
How To Tarp A Roof Leak Safely
A tarp is the best DIY cover for a larger leak, but only on a dry, low, walkable roof, and only after the weather has passed. Done right, it sends water over the damage instead of into it.
Get a heavy poly tarp big enough to run from below the leak, up the slope, and over the ridge, with about 4 feet of extra past the damage on every side. Roll one edge around a 2×4 to make an anchor board, then screw that board through the tarp into the roof near the ridge so wind can’t peel it up. Run the tarp straight down the slope, past the eave, and wrap the bottom edge around a second 2×4. Sandwich the side edges with more boards or hold them with cap nails. No loose corners. A flapping corner defeats the whole thing.
One honest warning. Don’t treat a tarp as a season. FEMA builds the sheeting in its Operation Blue Roof program to last about 30 days, not the 90 you’ll see claimed on other roofing sites. Sun and wind break poly down fast. A tarp is a bridge to a repair, nothing more.
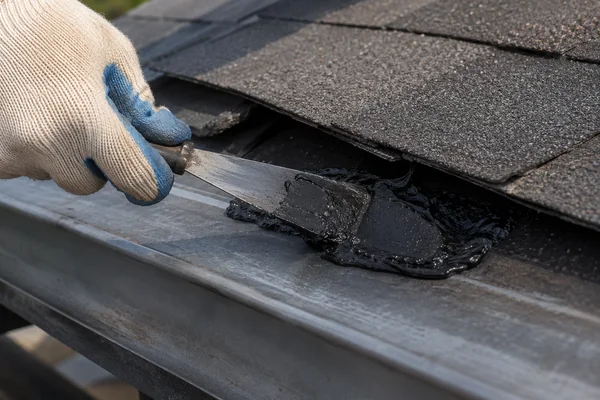
Roofing Cement For Small Holes And Lifted Shingles
For a small hole, a lifted shingle, or a gap around flashing, asphalt roofing cement is the right tool, and a gallon runs about $20 to $45. Clean the spot as best you can, trowel the cement on, press any lifted shingle down into it, and feather the edges so water sheds off. Use it sparingly. Piling it on traps water underneath and makes things worse.
One New England tip: buy the fiber-reinforced version. It bonds on a damp surface, which matters here, because you rarely get a clean dry window between storms. Cement will hold for weeks, sometimes a couple of months, but it’s a patch, not a permanent roof repair.
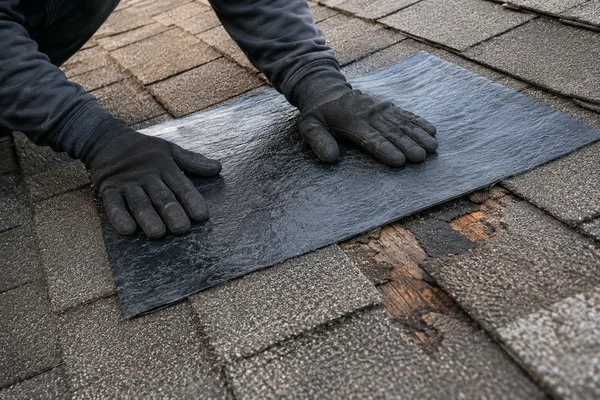
Self-adhering Membrane For Bigger Areas
When the damage is bigger than your hand, self-adhering membrane is the closest thing to a real temporary fix a homeowner can do. It’s the same ice-and-water shield pros roll out as underlayment. Slide the patch under the surrounding shingles if you can, cut it to overlap the damage by at least 4 inches on all sides, peel the backing, and press hard across the whole thing. A roll runs about $75 to $250, though you only need a few feet for a patch, and a clean, dry application holds through several storms.
What You Should Never Put On A Roof Leak
Skip the spray cans. Flex Seal and similar aerosols don’t bond to asphalt shingles. They skin over the surface and can wreck the shingle underneath. Worse, they fool you into thinking the leak is sealed. You stop paying attention, the water keeps coming, and that 24-to-48-hour mold clock is already running.
Same goes for duct tape (it won’t grab a wet, gritty shingle), a bead of silicone caulk squeezed in during the rain, and rock salt tossed on an ice dam. None of them do what the label or the internet promises on a real roof.
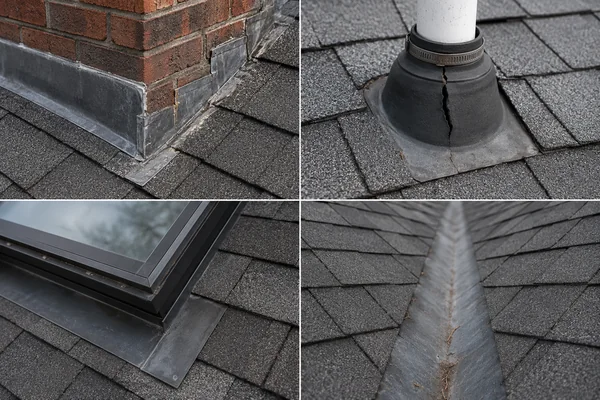
Where Massachusetts Roofs Leak Most
Most leaks aren’t in the open field of shingles. They’re at the transitions, the spots where the roof meets something else. Chimney flashing tops the list. Then pipe boots, where the rubber collar around a vent pipe cracks and splits after 10 to 15 years. Then skylights, valleys where two roof planes meet, and the step flashing along a wall or dormer. In winter, add the eaves, where ice dams form.
Across the roofs we inspect, the trouble almost always traces back to one of those, an old pipe boot, failed flashing, a bad prior install, or a worn valley, rather than the shingle itself. A leaking skylight is its own common culprit and often needs the flashing kit redone, not just a bead of sealant.

What Does Emergency Roof Leak Repair Involve?
A DIY temporary fix may require roofing cement, a self-adhering membrane, a heavy-duty tarp, lumber, and cap nails. Hiring a professional to tarp and stabilize the roof depends on the roof’s size, pitch, damage, and how difficult the leak is to reach.
| Item | Notes |
|---|---|
| Asphalt roofing cement | Useful for small holes and flashing gaps |
| Self-adhering membrane, such as ice and water shield | Only a small section may be needed for a temporary patch |
| Heavy poly tarp, 2x4s, and cap nails | Used to cover and secure a larger damaged section |
| Box fans and a dehumidifier | Help dry the affected interior space |
Will A Temporary Fix Hurt Your Insurance Claim?
No. The opposite is true. Your homeowners policy expects you to take reasonable steps to prevent further damage, so a documented temporary repair helps your claim rather than voiding it. The Insurance Information Institute calls this your duty to protect the property from further damage, and it tells homeowners to make temporary repairs and keep the receipts, because those costs get folded into the settlement.
This isn’t a rare situation, either. Water damage and freezing is one of the most common home insurance claims in the country, hitting about 1.5 of every 100 insured homes a year and averaging around $15,400 per claim, according to Insurance Information Institute data. So document it like it counts: photos and video before and after, receipts for every material, and a written log of what you did and when. Leave the damaged materials in place until the adjuster sees them. If the leak came from wind or a fallen limb, that’s a storm damage claim, and we can document it and meet your adjuster.
When To Stop Patching And Call A Pro
A temporary fix buys you time. It doesn’t fix the roof. The water is still getting in somewhere, and the real problem, wet decking, failed flashing, or a roof at the end of its life, only gets worse from here.
We’re not going to tell you the sky is falling. If it’s a $300 repair, we’ll say so. If the roof is truly done, we’ll show you the photos and explain why in plain English instead of scaring you into a sale. Powersol Roofing works across Quincy, the South Shore, Greater Boston, and towns like Taunton, Randolph, Brockton, Bridgewater, New Bedford, Fall River, and Dorchester. Knowing how to temporarily stop a roof leak keeps the damage small. Getting it fixed right keeps it gone. You can book a roof inspection or reach us through our contact page and we’ll get you on the schedule.
Frequently Asked Questions
How do I temporarily stop a roof leak from the inside?
Go into the attic with a flashlight and find the actual entry point, which is usually uphill from the ceiling stain because water travels along the rafters. Put a bucket directly under it and drape plastic sheeting over the surrounding rafters to steer water into the bucket. Then run fans and a dehumidifier, since the EPA says mold can start within 24 to 48 hours of a material getting wet.
Can I use Flex Seal to stop a roof leak?
No. Flex Seal and other aerosol sprays don’t bond to asphalt shingles. They only coat the surface, can damage the shingle, and leave you thinking the leak is sealed when it isn’t. For a small breach use asphalt roofing cement, and for a larger area use a self-adhering membrane patch.
How long does a temporary roof patch last?
It depends on the method. Roofing cement on a small spot holds for weeks to a couple of months. A self-adhering membrane patch can last through several storms. A tarp is the shortest-lived option: FEMA builds its Operation Blue Roof sheeting to last about 30 days, not the 90 you’ll see claimed elsewhere. None of these is permanent.
Is it safe to get on my roof to stop a leak?
Usually not, especially after a storm or in winter. OSHA treats anything steeper than a 4 in 12 slope as a steep roof and calls for fall protection above 6 feet, and research using federal injury data counts more than 130,000 ladder-related ER visits a year. Work from the inside whenever you can, and only consider a low, dry, reachable section on a calm day with someone spotting you.
Why does my roof only leak in winter?
That’s almost always an ice dam, not a hole. Heat escaping into the attic melts snow on the roof, the water refreezes at the cold eave, and it backs up under shingles that aren’t damaged. Patching the surface won’t help. Rake snow off the lower roof from the ground and address attic insulation and ventilation for a real fix.
Will a temporary roof repair affect my insurance claim?
No, and skipping it can hurt you. Your policy includes a duty to prevent further damage, so the Insurance Information Institute tells homeowners to make temporary repairs and keep the receipts, which get added to the settlement. Photograph everything before and after, and leave damaged materials in place until the adjuster sees them.
What should I do about a bulging, water-filled ceiling?
Poke a small hole at the lowest point of the bulge with a screwdriver and put a bucket under it. A slow, controlled drain is far safer than letting the ceiling collapse on its own. Move people and furniture out of the room and keep everyone clear until it dries.